My in-laws like to speak fondly of my husband’s grandmother’s talent as a home dressmaker. She lived in New York, and used to window shop at the finest designers then go home and make up her own designs using her favorite elements just from looking at the garments! When I picked up sewing as an adult, I remember sighing over these stories, wishing I had the talent and skill that Muriel displayed in the 1950’s and 1960’s. I had no idea how to get those skills. I won’t say I have them completely, yet, but I can see them on the horizon. What’s changed? I learned how to draft pattern blocks and manipulate them into garment patterns.
Continue reading “Drafting Your Own Patterns Step 1: Drafting a Bodice Sloper or Block”Blog

Test for Twins N Needles Podcast
This is a test episode to make sure we have set it up correctly! We’re looking forward to chatting about sewing with all of you Twin Citizens and internet denizens!
Podcast: Play in new window | Download

Four Steps to Get Ready to Sew Your Greenstyle Sundance Jacket
I’m excited to see those of you who will be joining me for class in about a month. (It’s not too late to sign up!) A big part of any sewing project is just getting ready to sew it! I thought it might help everyone if I broke down what I’m going to do to get ready for class. My plan is to prep both test pieces for class and what I need to actually make my jacket at the same time. You may choose to do almost none of this, or all of it!
Step 1: Prep your pattern
Choose your size. Assemble, if needed, and trace or cut out your pattern pieces. Consider adding a matching notch to the back yoke.
Step 2: Mise en place
This is chef-talk for “make sure you have all of your stuff.” It’s not such a horrible thing to have to order zippers halfway through a project, but it is annoying! If you’re prepping for both class and actually sewing your jacket at the same time, you’ll need:
- Two (or three) plastic standard (not invisible-style) zippers, at least 6 inches long (If you are like me, you’ll want three of these, two for your jacket and one just to try the techniques.)
- A zipper foot that is compatible with your machine
- Ball-point and/or stretch sewing machine needles
- Wash away wonder tape or stitch witchery
- Scraps of lightweight stretch knit fabric, such as athletic mesh or tricot, large enough to cut four or six pocket pieces
- One (or two) separating (jacket) zipper, 24 inches long, #5 weight is recommended (Again, I hate tearing things out, even for a test. If you’re like me, just get two zippers and use one for testing and one for your jacket.)
- Fabric for your project, prewashed
- Optional, but a big help: a walking foot that is compatible with your machine
- Optional, but also a big help: fusible tricot interfacing
- Optional: If you’re not using a serger, consider getting fold over elastic, hem tape, or other trim to add to the inner edge of your hem facing. I tested finishing that edge with a zigzag stitch and I wasn’t happy with the results.
- Optional: A print out of your instructions. We’ll be skimming over them in class, but you may want them handy to take notes or just keep from getting lost.
Step 3: Cut your fabric and prep your interfacing
Cut your pattern pieces according to the pattern, but also cut the following to use in class:
- Four strips of knit fabric, at least 2 inches wide and 24 inches long, cut with the greatest amount of stretch along the narrow edge
- Three front pocket pieces and three back pocket pieces. One set is to test in class and the other two sets are to actually make your jacket.
If possible, keep your pattern pieces with the fabric pieces after you cut. Some of the pieces in this jacket are similar in size and shape, and it would be easy to get them mixed up.
Consider using a fusible knit interfacing in the following areas: bottom hem facings, collar, zipper facing, the front edge of the jacket, and at the bottom sleeve hems if you don’t want to use a cuff.
- Test the interfacing on a scrap of your fabric before you do anything else with it. Always use a press cloth. I like to use tissue paper as a press cloth for fusibles. If you’re sewing along in class, you’ll want to interface two of your 2-inch-wide fabric strips with 1-inch strips of interfacing, so you can use those as your test. Place the interfacing along one long edge of each piece, not down the center of the strip.
- Interfacing for the bottom hem facings could be cut separately or block fuse interfacing to your fabric before cutting those pattern pieces. My fabric is kind of squishy and springy, so interfacing before cutting could help keep the hem facing pieces’ size and shape more consistent. I’ll demonstrate block fusing in class.
- Cut interfacing for the collar using the collar pattern piece, but don’t fuse it, yet. There’s a trick to making the inside of your collar neater that I want to show you in class.
- For the front edge of the jacket, apply 1-inch strips of interfacing just before step 35. You can’t really do it at the cutting-out stage because it extends past the collar/hood seam. Your edge may have stretched out as you worked, so make sure your interfacing strips are the same length as your zipper, then use that to pull your front edge to size as you fuse.
- I like a 2-inch-wide strip of interfacing for a 1-inch sleeve hem.
Step 4: Prep your equipment
Put a new needle in your sewing machine and wind two bobbins of thread. Using a scrap, test your stitch settings for seams and topstitching. On my machine, I liked a 10 sts/inch (2.5 mm) long and 1.5 mm wide for construction and 8 sts/inch (3 mm) long for topstitching. For hems, I liked 10 sts/inch (2.5 mm) long and the narrowest possible zigzag on my machine.
If you use a serger, you’ll still need a sewing machine for the side seam if you want pockets and to sew your zipper facing, zipper applications and for basting tricky seams (the back yoke, the front princess seams and the sleeves).
On my serger, double knits perform best using the four-thread ultra-stretch mock safety stitch. (Boy, does that trip off the tongue!) It’s a two-needle, four-thread stitch. I think it’s also called just a four-thread overlock or a 3/4 stitch. Make sure you test stitch a seam that’s across the fabric’s grain as well as along the grain, to check for stretching. Don’t forget to put new needles in your serger, too!
Zippers in Knits – Tricks to Try
We love them. We (sometimes) fear sewing with them. In some cases, practice is the best instructor. That helps, of course, but a few well-applied tools can make inserting zippers into a knit garment much easier.
This is what might happen if you just grab a zipper and sew a knit fabric to it:

The clip is holding the fabric to the zipper halfway down the test seam. What you can see just in front of the clip is what I call “the bubble of doom.” Here, it’s showing me that the fabric is stretching as I sew. The zipper tape isn’t stretchy, so, as I sew (and stretch) along, the fabric is growing longer than the non-stretchy zipper tape.
There are a few things I could do to reduce the fabric’s stretching. I could lower the presser foot pressure. I could pin the edge with a pin every inch.
I could also call in reinforcements. In this case, I like to add two helpers to my team, so to speak.
Enter one of my favorite sewing tools: wash away wonder tape.
In my opinion, using wash away wonder tape is like having access to the perfect type of pin or instant basting. It’s perfect because it serves as pins and basting you never have to take out, because it just goes away in the first wash!

Simply stick the tape along the edge of your zipper tape, remove the paper backing, and stick your fabric to your zipper edge. Adjust and readjust until you’re happy with it. Then, sew!
Much better!

Side note: mark the line where two seams should match up with chalk. It will save you lots of guesswork!

This looks pretty good. The tape helped a lot! To be honest, though, the topstitching was kind of hard to manage and it’s also not laying as flat as I would like.

Enter my second helpful tool. In this test, I’m trying 1-inch-wide fusible tricot strips. I’m fusing with an iron set to “wool” and using a tissue press cloth.
I also switched back to my walking foot for topstitching. I think it made it easier to control. This machine can be set with the needle in the left position, so it makes topstitching with a walking foot easier.

Final results. Wonder tape used on the left. On the right, fusible tricot strips and wonder tape were used together.

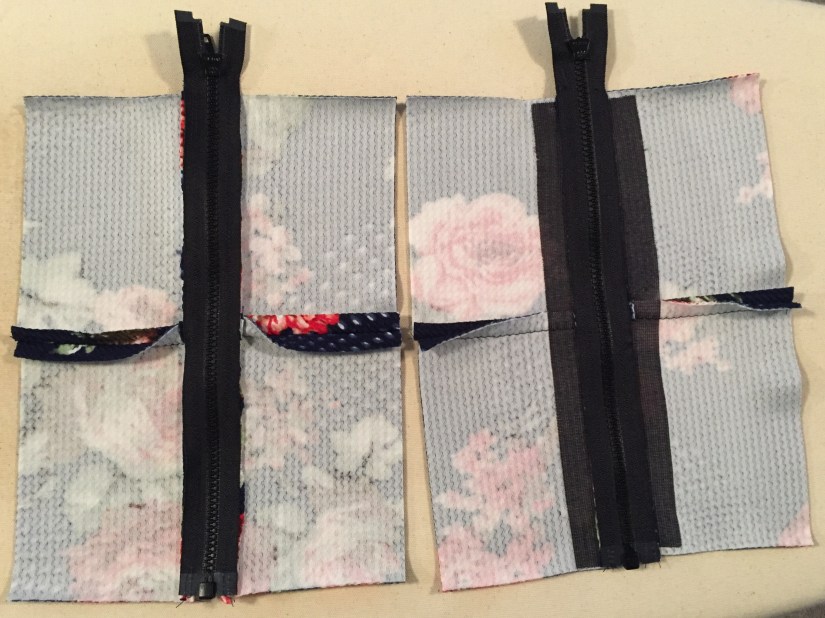
I think the one one the left is fine, but the one on the right does look a little neater. Also, the fused edge held the seam allowances more flat as I sewed, which does make that bump easier to stitch over.
One final note: the fused edge did “draw up” a little. It’s still a little stretchy, so just make sure your fused edge isn’t shorter than it should be by comparing it to your zipper tape before you sew. If it has drawn up, you can gently stretch it to the correct length when you baste to the zipper tape using wash away wonder tape.
Choosing Fabric for Greenstyle’s Sundance Jacket

This is one of the topics we will discuss in class, but if you want to choose your material and cut strips for practice during class, I want to help you get ready!
The notes say that the pattern “…is suitable for medium to heavy weight stable knits like double knits, Ponte de Roma, scuba knit, medium-heavy weight Supplex.”
“Stable knit” is one of those terms that can scare you right off from choosing knits. Basically, it’s a knit fabric that has a little (not a lot) of stretch and a lot (not a little) recovery.
You want a fabric that has at least 25% stretch in the horizontal direction. To test this, fold a piece of your fabric along a top or bottom edge, line it up against a four-inch length of ruler or a gridded surface, and stretch it. It should easily stretch to 5 inches wide. If your fabric stretches a lot more than that, you may want to cut the next size down in the pattern.
In the vertical direction (along a selvedge edge), the fabric should stretch 25% or less.
Test recovery by poking your thumb or finger very firmly into the fabric near a selvedge edge. If, after a few minutes, you can still see where you poked the fabric, your fabric may not have enough recovery for this project.
I’m sewing my samples in Liverpool, which is a very easy-to-sew double knit fabric. (This is the exact fabric. Please note that we are not affiliated with Girl Charlee.) Another good option is Heavy Brushed Athletic Performance fabric from Greenstyle. (We are connected to Greenstyle, but this is not an affiliate link.)
I’ve seen lovely versions of this jacket in Supplex and in a reversible knit.
I also love the idea of making this jacket as my first scuba knit project. This one is so great!
Don’t forget that, whatever fabric you choose, you’ll probably want a lighter-weight fabric for your pockets. I’m using nylon tricot for mine. An athletic mesh would also be nice and very RTW.
For more background on sewing knit fabrics, check out this Threads Magazine article by Ann Person, a piece on Ponte Knits by Nancy Nix-Rice (subscription and login required), and Sourcing Scuba Knit by Stephani L. Miller.